
Achieving Professional-Quality Results with Your Sander: Pro Tips and Tricks
Sanding is an essential step in many DIY projects, whether you’re refinishing a piece of furniture or preparing a surface for painting. It’s crucial to choose the right sandpaper grit for the job and to understand the various sanding techniques to achieve a smooth and even finish. In this blog post, we will explore the importance of selecting the correct sandpaper grit, mastering sanding techniques, preventing common mistakes, optimizing sanding speed and pressure, and adding the perfect finishing touches with polishing and buffing. Prepare to take your sanding skills to the next level!
Choosing the Right Sandpaper Grit
When it comes to achieving a smooth and polished surface, choosing the right sandpaper grit is crucial. The grit of sandpaper refers to the number of abrasive particles per square inch that the paper contains. Different sandpaper grits are designed for specific tasks, and selecting the correct grit for your project can make a significant difference in the final result.
1. Understanding Sandpaper Grit Numbers: Sandpaper grits are categorized into four main groups: coarse, medium, fine, and extra fine. Coarse grits, such as 40 or 60, are used for heavy material removal or shaping surfaces. Medium grits, like 80 or 100, are suitable for smoothing out rough surfaces or removing previous finishes. Fine grits, such as 120 or 150, are ideal for preparing surfaces for staining or painting. Extra fine grits, like 220 or 320, are used for achieving a smooth and refined finish.
2. Matching Grits to the Task: To select the right sandpaper grit, consider the specific requirements of your project. If you need to remove an old finish or level an uneven surface, start with a coarse grit and gradually progress to finer grits. For fine tuning and preparing the surface for a finish, use medium to fine grits. If you are working on delicate surfaces, such as wood veneer or painted surfaces, it is recommended to start with a higher grit to avoid damaging the material.
3. Testing and Adjusting: It’s important to test the sandpaper grit on a small, inconspicuous area before proceeding with the entire surface. This allows you to evaluate the abrasive action of the sandpaper and make any necessary adjustments. If the sandpaper is too aggressive and leaves visible scratches, switch to a higher grit. Conversely, if the sandpaper is not providing enough abrasion, switch to a lower grit.
Using the appropriate sandpaper grit for your project ensures not only a successful outcome but also saves time and effort. Keep in mind that different materials may require different grits, so it’s always a good idea to consult the manufacturer’s recommendations or seek professional advice when in doubt. By choosing the right sandpaper grit, you are well on your way to achieving a smooth and flawless surface.
Mastering Sanding Techniques for Even Surfaces
When it comes to achieving a smooth and flawless finish on woodworking projects, mastering sanding techniques is essential. Whether you’re a professional woodworker or a DIY enthusiast, the ability to create even surfaces through sanding can make a significant difference in the final outcome of your project. In this blog post, we will dive deeper into the art of sanding and explore some effective techniques that can help you achieve those coveted smooth surfaces.
1. Choosing the Right Sandpaper Grit: Before diving into sanding, it’s crucial to understand the different grits of sandpaper available and how to choose the right one for your project. Coarser grits, such as 40 or 60, are ideal for removing rough surfaces or paint, while finer grits, such as 120 or 220, are more suitable for smoothing and prepping the surface for finishing. Remember to start with a coarser grit and gradually work your way up to finer grits for optimal results.
2. Using Proper Sanding Techniques: The key to achieving even surfaces lies in using the proper sanding techniques. Always sand in the direction of the wood grain to avoid creating unsightly scratches. Apply consistent pressure and use long, smooth strokes to ensure an even sanding pattern. Avoid applying too much pressure, as it can cause uneven surfaces or damage the wood. Additionally, periodically check the surface with your hand to ensure it feels smooth and even.
3. Preventing Common Sanding Mistakes: To achieve perfect surfaces, it’s essential to avoid common sanding mistakes that can mar the appearance of your project. One common mistake is using worn-out sandpaper. Make sure to replace the sandpaper regularly, especially if it becomes clogged or loses its grit. Another mistake is sanding too aggressively in one spot, which can create depressions. Keep the sanding motion consistent and evenly distribute the sanding across the surface.
- Always wear protective gear, such as goggles and a dust mask, to protect yourself from dust and debris.
- Make sure to sand all areas, including edges and corners, to achieve uniformity.
- Use hand sanding or sanding blocks for hard-to-reach areas.
- Periodically clean the sandpaper or use a sandpaper eraser to remove buildup and extend its lifespan.
| Pros of Mastering Sanding Techniques for Even Surfaces | Cons of Neglecting Proper Sanding Techniques |
|---|---|
| Creates a professional and polished look | Uneven surfaces and imperfections on the finished project |
| Enhances the longevity of the wood by removing rough spots and preventing splintering | Inconsistent finish that may affect the application of stains or paints |
| Improves the overall aesthetic appeal of the woodworking project | Difficulty in achieving a smooth finish or consistent color |
Mastering sanding techniques for even surfaces is the key to achieving professional-looking woodworking projects. By choosing the right sandpaper grit, using proper sanding techniques, and avoiding common mistakes, you can ensure that your surfaces are smooth, flawless, and ready for the finishing touches. Remember, patience and precision are essential when it comes to sanding, so take your time, work systematically, and enjoy the rewarding results.
Preventing Common Sanding Mistakes
Sanding is an essential step in many woodworking and DIY projects. It helps to create a smooth and even surface for painting, staining, or finishing. However, it is important to avoid common sanding mistakes that can ruin your hard work and lead to unsatisfactory results.
One common mistake is using the wrong sandpaper grit. The grit refers to the size of the abrasive particles on the sandpaper. Using a grit that is too coarse can cause deep scratches, while using a grit that is too fine may not effectively remove imperfections. It is important to choose the right grit for the task at hand. Coarser grits, such as 60 or 80, are suitable for removing heavy material or leveling uneven surfaces. On the other hand, finer grits, such as 180 or 220, are ideal for smoothing the surface and preparing it for finishing touches.
Another mistake to avoid is applying too much pressure while sanding. Many people believe that pressing harder will achieve faster and better results. However, this can actually cause damage to the surface. Excessive pressure can create depressions and uneven spots on the material. It is important to let the sandpaper do the work and apply just enough pressure to maintain contact with the surface. Remember to keep your hand movements smooth and consistent for an even finish.
One more common mistake is neglecting proper sanding technique. It is important to sand in the direction of the wood grain to prevent scratches and ensure an even surface. Sanding against the grain can cause tear-out and leave behind unsightly marks. Always sand with the grain, moving in long, even strokes. If you are sanding a curved or irregular surface, consider using sanding blocks or other tools that can conform to the shape and provide consistent pressure.
- Choose the right sandpaper grit for the task
- Avoid applying excessive pressure
- Sand in the direction of the wood grain
| Mistake | Prevention |
|---|---|
| Using the wrong sandpaper grit | Choose the appropriate grit for the specific task: coarse for material removal, fine for smoothing |
| Applying too much pressure | Apply just enough pressure to maintain contact with the surface, letting the sandpaper do the work |
| Neglecting proper sanding technique | Sand with the grain, using long, even strokes or appropriate tools for irregular surfaces |
By preventing these common sanding mistakes, you can achieve better results and save time and effort in your woodworking projects. Remember to be patient and take your time when sanding, as it is a crucial step in creating a professional-looking finish. Happy sanding!
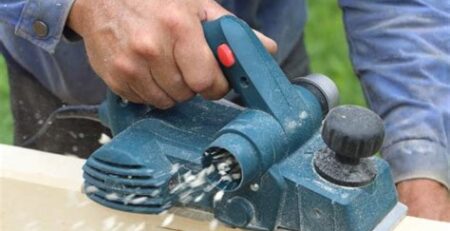
Optimizing Sanding Speed and Pressure
When it comes to sanding, achieving the perfect finish requires more than just selecting the right sandpaper grit. Another important factor to consider is the speed and pressure at which you sand. Optimizing sanding speed and pressure can make a significant difference in the quality of your finished project.
One key aspect to keep in mind is that sanding should always be done in a controlled and gradual manner. Applying excessive pressure while sanding can lead to unwanted scratches and uneven surfaces. On the other hand, sanding too slowly or with insufficient pressure may result in an uneven finish or leave behind imperfections.
To achieve optimal results, it’s important to find the right balance between sanding speed and pressure. Start by adjusting the speed of your power sander or the strength of your hand movements. Experiment with different speeds and pressure levels on a scrap piece of wood or an inconspicuous area of your project until you find the sweet spot.
- Begin by sanding at a moderate speed with medium pressure. This allows the sandpaper to efficiently remove the desired amount of material without causing any damage.
- If you notice that the surface is becoming too hot or the sandpaper is wearing down too quickly, reduce the speed or pressure.
- On the other hand, if you find that the sanding process is taking too long or not producing the desired smoothness, try increasing the speed or pressure slightly.
Remember, patience is key when it comes to sanding. Take your time and make sure to regularly check the progress of your work. It’s also important to switch to a finer grit sandpaper as you approach the final stages of sanding, gradually reducing the pressure to achieve a smooth and polished finish.
| Optimizing Sanding Speed and Pressure Tips: |
|---|
| 1. Find the right balance between speed and pressure by experimenting on a scrap piece of wood. |
| 2. Start with medium pressure and adjust accordingly to avoid scratches or uneven surfaces. |
| 3. Regularly check the progress to ensure you are achieving the desired smoothness. |
| 4. Switch to finer grit sandpaper as you approach the final stages, reducing pressure for a polished finish. |
Finishing Touches: Polishing and Buffing
The finishing touches of a woodworking project can make all the difference in the final outcome. Among these finishing techniques, polishing and buffing are crucial steps to achieve a smooth, glossy, and professional-looking surface. While sanding helps in leveling and smoothing the wood, polishing and buffing take it a step further by enhancing the shine and removing any remaining imperfections. In this blog post, we will delve into the art of polishing and buffing, exploring the techniques and tools needed to achieve that flawless finish.
One of the primary tools used in polishing and buffing is a polishing compound. This compound is typically a mixture of abrasive particles suspended in a wax or grease base. The choice of compound depends on the specific needs of the project. For example, a coarse compound is ideal for removing deep scratches or blemishes, while a fine compound is best for achieving a high-gloss finish. It is recommended to experiment with different compounds on a scrap piece of wood to determine the most suitable one for your project.
Once a suitable compound is selected, it is time to apply it to the wood surface. There are a few different ways to do this, including using a rotary tool with a polishing pad or a cloth wheel attachment. The key is to apply even pressure as you move the tool across the surface. Make sure to follow the grain of the wood to avoid any unwanted swirl marks. If you are working on a delicate or contoured surface, hand polishing with a soft cloth may be a better option.
After the initial polishing is complete, it is time to move on to buffing. Buffing involves using a clean cloth or buffing wheel to further enhance the shine of the wood surface. Similar to polishing, a rotary tool can be used with a buffing pad attachment. Alternatively, a buffing wheel can be mounted on a bench grinder or a lathe for larger projects. The key is to work in small, overlapping circles to ensure an even buffing across the surface. This will help to remove any remaining fine scratches and bring out the natural luster of the wood.
Finally, after completing the buffing process, it is important to carefully inspect the surface for any imperfections. If necessary, you can repeat the polishing and buffing steps until you are satisfied with the result. Once the desired level of shine and smoothness is achieved, you can apply a protective finish such as wax or polish to preserve the wood’s beauty for years to come.
To summarize, polishing and buffing are essential steps in achieving a professional finish for woodworking projects. By choosing the right polishing compound, using the appropriate tools, and applying the techniques correctly, you can bring out the natural beauty of the wood and create a flawless surface. Remember to take your time, experiment with different compounds, and always follow the direction of the wood grain. With practice, you will master the art of polishing and buffing, adding that final touch of elegance to your woodworking creations.
Frequently Asked Questions
What is the importance of choosing the right sandpaper grit?
Choosing the right sandpaper grit is important because it determines the level of abrasiveness and how quickly it will remove material. A finer grit is suitable for finishing touches, while a coarser grit is needed for heavy sanding or material removal.
How can I master sanding techniques for achieving even surfaces?
To master sanding techniques, start with a coarser grit to remove imperfections, then progress to finer grits for a smoother finish. Use steady, even strokes, and sand in the direction of the wood grain to avoid cross-grain scratches.
What are some common sanding mistakes and how can I prevent them?
Some common sanding mistakes include using too much pressure, using the wrong grit, and skipping grits. To prevent them, apply light and consistent pressure, ensure the grit is appropriate for the task, and sand through all the necessary grits for a smooth result.
How can I optimize sanding speed and pressure?
Optimizing sanding speed and pressure is crucial for efficient sanding. Keep a moderate speed and let the sandpaper do the work instead of applying excessive force. Be patient and allow the sandpaper to remove material gradually while maintaining consistent pressure.
What are some techniques for achieving a polished and buffed finish?
To achieve a polished and buffed finish, start with a fine grit sandpaper to smooth the surface. Then, apply a polishing compound or wax and buff it using a soft cloth, buffing pad, or rotary tool. This will enhance the shine and remove any remaining imperfections.
How can I create smooth edges during sanding?
Creating smooth edges involves using sandpaper with a higher grit, such as 220 or finer, and carefully sanding the edges with light pressure. Round off sharp edges by sanding them at a slight angle and blending them into the surrounding surface for a seamless finish.
What factors should I consider when choosing the right sanding tools?
When choosing sanding tools, consider the project type, material, and desired finish. Handheld sanding blocks or sanding sponges are versatile for smaller tasks. Power sanders vary in types like orbital or belt sanders, providing more efficiency for larger or more demanding projects.


Leave a Reply