
Step-by-Step Instructions for Using a Post Hole Digger
Are you planning on installing a fence, mailbox, or a new signpost? If so, you’ll need a reliable and efficient tool to dig the perfect hole for your project. In this blog post, we will guide you through the process of choosing the right post hole digger, preparing the ground for digging, using the tool correctly, ensuring your safety throughout the job, and finally, maintaining and storing your post hole digger for prolonged use. Let’s get started on your next project with confidence and ease!
Choosing the right post hole digger
Choosing the right post hole digger is essential when it comes to any construction or landscaping project. Whether you are building a fence, installing a mailbox, or planting trees, having the right tool for the job can make all the difference. There are several factors to consider when selecting a post hole digger, including the type of soil, the depth and diameter of the holes needed, and your own physical capabilities.
Firstly, it is important to consider the type of soil you will be working with. Some post hole diggers are specifically designed for different soil conditions. For example, if you are digging in rocky or compacted soil, you may need a digger with auger blades that are more durable and sharp. On the other hand, if you are working in softer soil, a digger with wider auger blades may be more efficient.
Secondly, you need to determine the depth and diameter of the holes you will be digging. Post hole diggers come in various sizes, so it is important to choose one that can accommodate your specific needs. Consider the size of the posts or poles you will be installing and ensure that the digger has the capacity to create holes of the necessary dimensions.
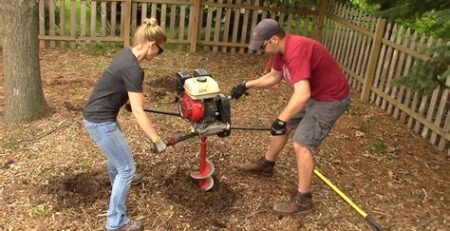
Finally, it is crucial to assess your own physical capabilities when choosing a post hole digger. Some diggers are manual and require physical strength and stamina to operate, while others are powered by gas or electricity, reducing the amount of effort required. If you have any physical limitations or concerns, it may be worth investing in a powered digger to make the task easier and safer.
In summary, selecting the right post hole digger is essential for any digging project. By considering factors such as soil type, hole dimensions, and personal capabilities, you can choose a digger that is suitable for your specific needs. Remember to prioritize safety and choose a digger that is both efficient and comfortable to use. With the right tool in hand, you can ensure a successful and hassle-free digging experience.
Preparing the ground for digging
When it comes to digging holes for various purposes such as installing fence posts or planting trees, preparing the ground correctly is crucial. By taking the time to properly prepare the ground, you can ensure that your digging process goes smoothly and efficiently. Here are some essential steps you can follow to prepare the ground for digging:
- Locate utilities: Before you start digging, it is important to locate any underground utilities such as gas lines, water pipes, or electrical cables. Contact your local utility company to mark the location of these lines to prevent any accidents or damage during the digging process.
- Clear the area: Remove any obstacles, debris, rocks, or plants from the area where you plan to dig. This will provide you with a clear workspace and prevent any hindrances while digging.
- Check the soil conditions: Assess the soil conditions in the area to determine its suitability for digging. If the soil is too compacted or contains a lot of rocks, you may need to use additional tools or techniques to make the digging process easier.
Once you have completed these initial steps, you can move on to the actual digging process. Remember to always follow the instructions provided by the manufacturer of your post hole digger and prioritize safety throughout the entire process.
Tips for preparing the ground for digging:
| Tip | Description |
|---|---|
| Check the weather conditions | It is advisable to choose a dry day for digging as wet soil can be more difficult to work with. Rainy or muddy conditions can slow down the digging process and make the soil more challenging to remove. |
| Use a shovel or pickaxe | If the soil is particularly compacted or rocky, using a shovel or pickaxe can help loosen it up before using the post hole digger. This will make the digging process smoother and more efficient. |
| Measure and mark the hole locations | Before you start digging, measure and mark the exact locations where you want the holes to be. This will ensure accuracy and prevent the need for any adjustments or re-digging. |
By following these steps and tips, you can effectively prepare the ground for digging and make the entire process easier and safer. Take your time, be cautious, and enjoy the satisfaction of a well-prepared ground ready for your project!
Using the post hole digger correctly
When it comes to using a post hole digger, it is essential to know the correct techniques and safety measures to ensure efficient and safe digging. Whether you are installing a fence, planting trees, or setting up a mailbox, using the post hole digger correctly is crucial for achieving the desired results. In this blog post, we will discuss some important tips and guidelines to follow when using a post hole digger.
1. Identify the right location: Before using a post hole digger, determine the exact location where you want to dig the hole. Make sure to check for any underground utility lines, pipes, or cables before starting the digging process. Mark the spot with a stake or flag to ensure accuracy and avoid any accidents.
2. Wear appropriate safety gear: Prioritize your safety by wearing the necessary protective gear. This includes goggles to protect your eyes from debris, sturdy work gloves to safeguard your hands, and steel-toed boots to protect your feet from potential injury. It is also recommended to wear long pants and a hard hat for further protection.
3. Position the digger correctly: Position the post hole digger near the designated spot, ensuring the handles are at a comfortable height for you to maneuver. Stand with your feet shoulder-width apart and brace your body to have better control and stability while digging. Maintain a proper grip on the handles, one closer to the blade and the other further up for balance.
4. Start the digging process: Press the blades of the post hole digger into the ground using your foot or hands. Apply steady downward pressure to break through the soil and continue working the digger in a circular motion. Keep in mind that the post hole digger works best when working with a rocking motion rather than using brute force or leaning on the handles.
5. Remove the soil: Once the hole is deep enough, lift the digger out of the ground while simultaneously closing the handles. This will help remove the soil from the digger’s blades and deposit it outside the hole. You can use a shovel or your hands to scoop out any remaining debris from the hole.
By following these guidelines, you can ensure that you are using the post hole digger correctly and safely. Remember to take breaks if needed, stay hydrated, and never rush the digging process. Taking the necessary precautions and using the right techniques will result in successful and hassle-free projects.
Ensuring safety while using a post hole digger
When it comes to using a post hole digger, safety should be the top priority. These powerful tools are designed to make digging holes easier and more efficient, but they can also be dangerous if not used correctly. By following a few simple safety guidelines, you can ensure a safe and successful digging experience.
1. Wear the Right Protective Gear:
- Before operating a post hole digger, it is essential to wear the appropriate protective gear. This includes goggles or safety glasses to protect your eyes from flying debris, gloves to provide a secure grip and protect your hands, and sturdy work boots to protect your feet from potential hazards.
- Additionally, wearing ear protection, such as earmuffs or earplugs, is recommended to reduce the noise level produced by the machinery and prevent hearing damage.
2. Inspect the Equipment:
- Before each use, carefully inspect the post hole digger for any signs of damage or wear. Check all parts, including handles, blades, and gears, to ensure they are in proper working condition.
- If you notice any faults or malfunctions, do not attempt to use the digger. Instead, have it repaired or replaced by a qualified professional to prevent accidents and injuries.
3. Know Your Surroundings:
Before starting to dig, it is essential to be aware of your surroundings. Take note of any underground utilities, such as gas, water, or electrical lines, to avoid accidentally damaging them.
It is also crucial to clear the work area of any obstacles, debris, or debris that may interfere with the digging process or cause tripping hazards.
| Key Safety Tips: |
|---|
| Always follow the manufacturer’s instructions and guidelines for safe operation. |
| Use the post hole digger in daylight or a well-lit area to ensure better visibility. |
| Do not operate the digger in extreme weather conditions, such as heavy rain or strong winds, as it may affect stability and control. |
| Take breaks during prolonged use to avoid fatigue, which can lead to accidents. |
By taking these precautions and following safety guidelines, you can ensure a safe and efficient digging experience with your post hole digger. Remember, safety should never be compromised for the sake of convenience or speed. Happy digging!
Maintaining and storing your post hole digger
Maintaining and storing your post hole digger is essential to ensure its longevity and efficient performance. By properly maintaining and storing your equipment, you can avoid unnecessary repairs and replacements, saving both time and money in the long run.
Here are some important tips to keep in mind for maintaining your post hole digger:
- Clean the Digger: After each use, make sure to remove any dirt, rocks, or debris from the blades and handles of your post hole digger. This will prevent any build-up that could potentially damage the equipment.
- Inspect for Damage: Regularly check your post hole digger for any signs of wear and tear. Look for cracks, loose parts, or bent blades. If you notice any damage, it’s important to address it promptly to prevent further issues.
- Apply Lubrication: To ensure smooth operation, lubricate the moving parts of your post hole digger regularly. Use a suitable lubricant, such as oil or grease, as recommended by the manufacturer.
- Sharpen the Blades: Over time, the blades of your post hole digger may become dull. It’s important to keep them sharp for efficient digging. Use a file or a grinder to sharpen the blades, following the manufacturer’s instructions.
Proper storage of your post hole digger is equally important to protect it from damage and maintain its performance. Consider the following storage tips:
- Store in a Dry Area: Moisture can lead to rust and corrosion, causing damage to your post hole digger. Store it in a dry area, such as a shed or garage, to protect it from the elements.
- Hang or Store Upright: To prevent any unnecessary strain on the blades or handles, hang your post hole digger on a wall or store it upright. Avoid resting or leaning it against other objects.
- Secure Loose Parts: Before storing your post hole digger, make sure all the parts are secure. This will prevent any potential damage or loss of components.
- Keep Away from Children: Ensure that your post hole digger is stored in a location that is inaccessible to children. It is a powerful and potentially dangerous tool that should only be used by adults.
By following these maintenance and storage practices, you can extend the lifespan of your post hole digger and ensure safe and efficient operation every time you need to dig holes.


Leave a Reply