
Creative Ways to Decorate Using a Glue Gun
Welcome to our blog post all about creative and innovative ways to use a glue gun in your home decor projects! Whether you’re a seasoned DIY enthusiast or just starting out, a glue gun can be your best friend when it comes to adding personalized touches to your living space. In this post, we’ll explore various ideas such as DIY Glue Gun Wall Art, Glue Gun Decorative Floral Arrangements, Upcycled Furniture with Glue Gun, Glue Gun Embellished Home Accessories, and Glue Gun Picture Frame Makeover. Get ready to unleash your creativity and transform your home with these fun and easy glue gun projects!
DIY Glue Gun Wall Art
When it comes to adding a unique touch to your home decor, can be a fantastic option. Not only is it a fun and creative project, but it also allows you to showcase your personal style and creativity. With just a few simple materials and a little bit of time, you can create stunning pieces of art that will be the focal point of any room.
One of the great things about creating DIY Glue Gun Wall Art is that it doesn’t require any special artistic skills. All you need is a glue gun, some glue sticks, and a bit of imagination. Begin by choosing a design or pattern that you want to create on your wall. It could be anything from abstract shapes to intricate designs or even words and quotes. Using the glue gun, carefully trace over the lines of your chosen design, allowing the glue to dry and harden.
Once the glue has completely dried, it’s time to add some color to your DIY Glue Gun Wall Art. You can use acrylic paints, spray paints, or even colored markers to bring life to your creation. Apply the paint to the areas that you want to color, being careful not to paint over the dried glue lines. This will create a beautiful contrast and make your design stand out.
To make your DIY Glue Gun Wall Art even more visually appealing, consider adding some additional embellishments. You can use beads, sequins, buttons, or even small trinkets to add texture and depth to your artwork. Simply glue them onto the surface of your design, or strategically place them along the lines for a stunning effect.
When you’re satisfied with your DIY Glue Gun Wall Art, it’s time to hang it up and showcase your creative masterpiece. Consider using adhesive hooks or wall mounting strips to attach your artwork securely to the wall without damaging the surface. By positioning your creation in a prominent area of your home, you can enjoy the admiration and compliments from your guests.
List of Materials:
- Glue gun
- Glue sticks
- Acrylic paints or spray paints
- Colored markers
- Beads, sequins, buttons, or trinkets (optional)
- Adhesive hooks or wall mounting strips
Table of Steps:
| Steps | Instructions |
|---|---|
| Step 1 | Choose a design or pattern. |
| Step 2 | Trace the design using a glue gun. |
| Step 3 | Let the glue dry and harden. |
| Step 4 | Add color using paints or markers. |
| Step 5 | Embellish with beads, sequins, or buttons. |
| Step 6 | Attach the artwork to the wall. |
Glue Gun Decorative Floral Arrangements
Decorative floral arrangements are a great way to add a touch of elegance and beauty to any space. And what better way to create these arrangements than using a glue gun? With a glue gun, you can easily create stunning floral displays that will impress your guests and brighten up your home or event. In this blog post, we will explore different techniques and ideas for creating beautiful decorative floral arrangements using a glue gun.
When it comes to creating floral arrangements with a glue gun, the possibilities are endless. You can use a variety of materials such as silk flowers, fabric flowers, or even dried flowers. The key is to choose flowers that are easy to work with and will hold their shape when glued. Silk flowers are particularly popular as they are realistic-looking and come in a wide range of colors and styles.
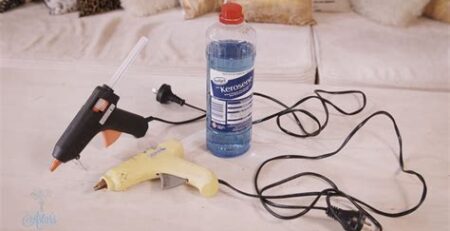
To start, gather your materials including a glue gun, floral foam or a vase, wire cutters, and your chosen flowers. If using silk flowers, you may also want to have some floral tape or wire on hand to secure the flowers. Once you have your materials ready, you can begin arranging your flowers. Start by cutting the stems of your flowers to the desired length. You can create a variety of heights and shapes to add visual interest to your arrangement.
- Step 1: Prepare your materials including a glue gun, floral foam or a vase, wire cutters, and your chosen flowers.
- Step 2: Cut the stems of your flowers to the desired length using wire cutters. Create a variety of heights and shapes to add visual interest.
- Step 3: Arrange the flowers in the vase or floral foam, starting with the largest flowers at the center and working your way outwards.
- Step 4: Use the glue gun to attach the flowers to the foam or secure them in the vase. Be careful not to use too much glue or it may be visible.
- Step 5: Once all the flowers are attached, you can add additional embellishments such as leaves, berries, or ribbon to enhance the arrangement.
And there you have it – a beautiful decorative floral arrangement created using a glue gun! The best part about using a glue gun for floral arrangements is that it allows you to have complete creative control. You can mix and match different flowers, colors, and textures to create a unique and personalized arrangement that suits your style and preferences. Whether you are looking to create a centerpiece for a special occasion or simply brighten up your home, a glue gun can be your secret weapon for stunning floral decor.
| Pros | Cons |
|---|---|
|
|
Upcycled Furniture with Glue Gun
Are you looking for creative ways to upcycle your old furniture? Look no further than using a glue gun to transform your furniture into unique and stylish pieces. Using a glue gun allows you to easily attach various materials, such as fabric, rope, or even decorative trims, to give your furniture a fresh new look. Not only is this a budget-friendly option, but it also allows you to unleash your creativity and personalize your furniture to match your style. In this blog post, we will explore different ideas for upcycled furniture using a glue gun.
One popular way to upcycle furniture with a glue gun is by adding fabric accents. You can use various types of fabric, such as patterned, solid-colored, or even textured fabric, to create a unique and eye-catching design. Whether you want to cover an entire piece of furniture or simply add fabric to specific areas, a glue gun makes it easy to attach the fabric securely. Consider adding fabric to the sides of a dresser, the seat of a chair, or even the backboard of a bookshelf. The possibilities are endless!
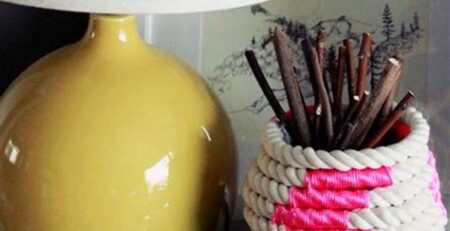
Another idea for upcycling furniture with a glue gun is by adding rope or twine accents. This can give your furniture a rustic and natural look. You can wrap rope or twine around the legs of a table or chair, create intricate patterns on the surface of a dresser, or even spell out words or designs. The flexibility of using a glue gun allows you to easily experiment with different techniques and create a truly unique piece of furniture.
In addition to fabric and rope, a glue gun can also be used to attach decorative trims or embellishments to your furniture. This could include adding lace trim to the edges of a tablecloth, attaching pom-poms to the corners of a pillow, or even gluing on decorative buttons or beads. These little details can make a big difference in transforming your furniture from plain and ordinary into something visually stunning.
Summary:
Upcycling furniture with a glue gun is a versatile and budget-friendly way to give your old furniture a fresh new look. Whether you choose to add fabric accents, rope or twine details, or decorative trims, a glue gun allows you to easily attach various materials and unleash your creativity. So instead of throwing away your old furniture, give it a second life by upcycling it with a glue gun!
Glue Gun Embellished Home Accessories
Glue guns are not just for arts and crafts projects anymore. They can be used to add a unique touch to home accessories and transform them into truly special and personalized pieces. Whether you want to spruce up your old decor or create something entirely new, glue guns can be your best friend in the DIY world of home embellishments.
One way to use a glue gun to embellish your home accessories is by adding decorative accents to plain vases or candle holders. With a little bit of creativity and a steady hand, you can create intricate patterns or designs using the hot glue. From swirls and lines to flowers and hearts, the possibilities are endless. Your plain vases will instantly become eye-catching centerpieces, while your candle holders will radiate a warm and cozy vibe.
Another idea to embellish your home accessories with a glue gun is by adding texture and dimension to plain picture frames. Start by selecting a few frames that need a makeover. Then, apply the hot glue directly onto the frame in a design of your choice. You can create abstract patterns, geometric shapes, or even write out words or phrases. Let your imagination run wild! Once the glue has cooled down and hardened, paint the frames in your preferred color or leave them as they are for a rustic look.
Lastly, consider using a glue gun to create unique and customized drawer pulls or doorknobs. This is a great way to add a personal touch to your furniture and give it a whole new look. Simply attach a small item or decorative piece to a metal drawer pull or knob using hot glue. It could be anything from seashells and gemstones to small toys or trinkets. Not only will this make your furniture stand out, but it will also make opening and closing drawers and doors a lot more fun!
- Decorative accents for vases and candle holders
- Textured picture frames
- Customized drawer pulls and doorknobs
| Benefits of Glue Gun Embellished Home Accessories | Examples |
|---|---|
| Unique and personalized home decor | Embellished vases, candle holders, and picture frames |
| Cost-effective way to enhance your home | DIY drawer pulls and doorknobs |
| No specialized skills required | Anyone can create beautiful embellishments with a glue gun |
| Endless possibilities for creativity | Creative patterns, designs, and textures |
Glue Gun Picture Frame Makeover
A picture frame is a perfect way to preserve and display special memories. However, over time, the frame may start to look dull or outdated. Instead of purchasing a new frame, why not give it a makeover with a glue gun? With a little creativity and some hot glue, you can transform your picture frame into a unique and stunning piece of art.
Firstly, gather all the materials you will need for this project. This includes a picture frame, a glue gun, glue sticks, and any embellishments or decorations you want to add to the frame. You can use a variety of materials such as seashells, buttons, beads, or even small artificial flowers. The options are endless, so be sure to choose items that align with your personal style and the overall aesthetic you want to achieve.
To begin the makeover process, start by cleaning the picture frame thoroughly. Wipe away any dust or dirt that may have accumulated over time. This will ensure that the glue adheres properly to the frame. Once the frame is clean and dry, you can start applying the hot glue. Use the glue gun to create intricate designs or patterns on the frame. Experiment with different shapes and textures to add dimension and visual interest.
Next, it’s time to add the embellishments to the frame. This is where you can let your creativity shine. Arrange the items you have chosen in a pleasing and balanced way. You can create a symmetrical design, or you can opt for a more random and eclectic arrangement. Attach the embellishments to the frame using the hot glue. Be careful not to burn yourself, as the glue can be extremely hot.
To ensure the longevity of your new and improved picture frame, consider sealing it with a protective coating. This will help to prevent any of the embellishments from coming loose. You can use a clear varnish or a sealant spray specifically designed for crafts. Apply a thin and even layer over the entire frame, making sure to cover all the glued areas. Allow the frame to dry completely before handling or displaying.
In conclusion, a glue gun picture frame makeover is a fun and creative way to breathe new life into an old and tired frame. With just a few simple materials and some imagination, you can transform your picture frame into a one-of-a-kind masterpiece. Whether you choose to create a whimsical design or a more sophisticated look, the possibilities are endless. So, pick up that glue gun and let your creativity take flight!
| Pros | Cons |
|---|---|
| Cost-effective | Requires careful handling of hot glue |
| Endless possibilities for design | Can be time-consuming depending on complexity |
| Personalized and unique | Might not suit all frames or décor styles |
| Allows for creativity and self-expression | May require additional maintenance if used in high-traffic areas |
Frequently Asked Questions
What is DIY Glue Gun Wall Art?
DIY Glue Gun Wall Art is a creative and unique way of using a glue gun to create artwork for your walls. You can use different colors and textures of hot glue to make interesting designs and patterns.
How can I make Glue Gun Decorative Floral Arrangements?
To make Glue Gun Decorative Floral Arrangements, you can use a glue gun to attach artificial flowers and greenery to different surfaces like vases, frames, or even on walls. It allows you to create customized floral arrangements that can be displayed anywhere in your home.
What can I do with Upcycled Furniture with Glue Gun?
Upcycled Furniture with Glue Gun refers to the process of using a glue gun to update and transform old or worn-out furniture. You can use the glue gun to add decorative elements, such as trims, buttons, or fabric, to give a new and unique look to your furniture.
How can I create Glue Gun Embellished Home Accessories?
To create Glue Gun Embellished Home Accessories, you can use a glue gun to add decorative accents to items such as candle holders, vases, or even lampshades. It allows you to personalize and enhance the look of your home decor.
What is Glue Gun Picture Frame Makeover?
Glue Gun Picture Frame Makeover is a fun and easy way to transform plain and ordinary picture frames into stylish and unique ones. You can use a glue gun to add various embellishments like beads, buttons, or even small trinkets to give your picture frames a new and improved look.
How can I make a Glue Gun Jewelry Organizer?
You can make a Glue Gun Jewelry Organizer by using a glue gun to create hooks or holders on a wooden board or any other suitable surface. This allows you to hang and display your jewelry in an organized and attractive way.
What are DIY Glue Gun Hair Accessories?
DIY Glue Gun Hair Accessories are hair accessories such as hair clips, headbands, or hair combs that are decorated and customized using a glue gun. You can add embellishments like flowers, beads, or ribbons to create your own unique hair accessories.


Comments (2)
wow brilliant ideas thanks
thank you!