A Beginner’s Guide to Sharpening Tools with a Bench Grinder
Bench grinders are versatile and powerful tools that can greatly enhance your sharpening and grinding tasks. Whether you’re a professional mechanic or an avid DIYer, understanding how to use a bench grinder effectively is crucial. In this blog post, we will guide you through the process of understanding the bench grinder, choosing the right grinding wheel, preparing your tools for sharpening, exploring sharpening techniques for different tools, and most importantly, ensuring safety through essential tips and best practices. So, let’s dive into the world of bench grinders and take your sharpening skills to the next level!
Understanding the Bench Grinder
A bench grinder is a versatile tool that can be found in most workshops or garages. It is designed for sharpening, shaping, and polishing various materials, making it an essential tool for any DIY enthusiast or professional. Before using a bench grinder, it is important to have a good understanding of its functions, parts, and safety considerations.
Functions and Parts of a Bench Grinder
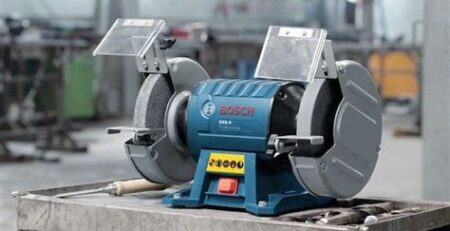
A bench grinder typically consists of a motor, grinding wheels, tool rests, eye shields, and a spark arrestor. The motor powers the grinding wheels, which are composed of abrasive materials such as aluminum oxide or silicon carbide. The tool rests provide support for the workpiece during grinding, while the eye shields protect the user from flying debris. The spark arrestor prevents sparks from causing fires or igniting flammable materials.
Using a Bench Grinder Safely
While a bench grinder is a powerful and useful tool, it can also be dangerous if not used correctly. Here are some safety tips and best practices to keep in mind:
- Always wear safety goggles or a face shield to protect your eyes from grinding debris.
- Ensure that the grinding wheels are properly secured and aligned before use.
- Keep a firm grip on the workpiece and maintain a stable stance while grinding.
- Avoid excessive pressure on the grinding wheels, as this can cause them to shatter.
- Regularly inspect the grinder for any signs of damage or wear, and replace worn-out parts immediately.
Choosing the Right Grinding Wheel
One of the key factors in achieving a successful grinding operation is selecting the right grinding wheel for the task at hand. Different materials and applications require different types of grinding wheels. Factors to consider when choosing a grinding wheel include:
| Type of Grinding Wheel | Applications |
|---|---|
| Aluminum Oxide | Ideal for grinding steel and iron |
| Silicon Carbide | Suitable for grinding non-ferrous metals, such as aluminum, brass, or copper |
| Diamond | Recommended for grinding hard materials, such as ceramic, glass, or carbide |
By understanding the different types of grinding wheels and their applications, you can ensure optimal results and extend the lifespan of your bench grinder.
In conclusion, the bench grinder is a valuable tool that can greatly enhance your woodworking or metalworking projects. Understanding its functions, parts, and safety considerations is crucial for maximizing its efficiency and ensuring your safety. By choosing the right grinding wheel for each task, you can achieve excellent results and prolong the lifespan of your bench grinder. Remember to always prioritize safety and follow the recommended guidelines when using this versatile tool.
Choosing the Right Grinding Wheel
When it comes to grinding, one of the most crucial decisions you need to make is choosing the right grinding wheel. The grinding wheel is the abrasive tool that is responsible for actually cutting and shaping the material you are working on. It is important to select the correct wheel because using the wrong one can lead to poor results and even safety hazards. In this blog post, we will explore the factors you should consider when choosing a grinding wheel, so you can make an informed decision for your grinding needs.
Type of Grinding Operation: The first thing to consider when selecting a grinding wheel is the type of grinding operation you will be performing. Different wheels are designed for specific types of grinding, such as surface grinding, cylindrical grinding, or tool and cutter grinding. Make sure to choose a wheel that is suitable for the operation you will be carrying out.
Material to be Ground: The second factor to consider is the material you will be grinding. Different materials have varying hardness, abrasiveness, and heat sensitivity. For example, grinding a soft material like aluminum requires a different wheel than grinding a hard material like stainless steel. Be sure to choose a wheel that is compatible with the material you will be working with.
Wheel Specifications: In addition to considering the type of operation and material, you need to look at the specifications of the grinding wheel itself. This includes the wheel size, abrasive grain type, bond type, and grit size. The wheel size should be compatible with your grinder and the size of the workpiece. The abrasive grain type and bond type determine the hardness and durability of the wheel. Finally, the grit size determines the coarseness or fineness of the wheel, depending on the surface finish you desire.
In conclusion, choosing the right grinding wheel is essential for achieving the desired results in your grinding operations. By considering the type of grinding operation, material to be ground, and wheel specifications, you can make an informed decision. Remember, using the wrong wheel can lead to poor performance and safety hazards. So, take the time to select the right grinding wheel and enhance your grinding experience.
Preparing the Tools for Sharpening
When it comes to sharpening tools, the preparation process plays a crucial role in achieving the desired results. Before diving into the sharpening techniques, it is essential to ensure that the tools are well-prepared for the task at hand. Preparing the tools involves several steps that help in improving their performance and prolonging their lifespan. Let’s explore the key aspects of tool preparation that can make sharpening tasks more efficient and effective.
Firstly, it is important to clean the tools thoroughly before sharpening them. This helps in removing any dirt, debris, or rust that may have accumulated on the surface. Using a soft cloth or brush, wipe away any visible particles from the tool’s body. For harder-to-reach areas, consider using a small brush or toothbrush. Additionally, if there is any rust present, gently scrub the affected areas with a mild abrasive or rust remover. Ensuring that the tools are clean will not only lead to a better sharpening experience but also prevent the sharpened blade from getting contaminated.
Next, inspect the tools for any signs of damage or wear. Before sharpening, it is crucial to identify any chips, cracks, or excessive wear on the tool’s cutting edges. These imperfections can affect the sharpening process and may need to be addressed separately. If there are small chips or nicks, using a honing stone or file to smooth them out can help in achieving a more uniform cutting edge. However, if the damage is significant or the tool is no longer in good condition, it may be necessary to replace it rather than attempting to sharpen it.
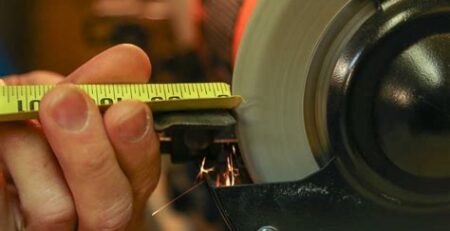
Lastly, adjust the tools to ensure optimal sharpening. Depending on the type of tool and the desired sharpness, different adjustments may be necessary. For example, chisels or plane blades may require repositioning or adjusting the bevel angle to achieve the desired cutting edge geometry. Additionally, inspecting and adjusting the tool’s guide or jig can help in maintaining consistency during the sharpening process. Taking the time to make these adjustments before starting the sharpening process can greatly enhance the overall outcome.
Sharpening Techniques for Different Tools
When it comes to sharpening tools, one size does not fit all. Different tools require different sharpening techniques to ensure optimal performance and longevity. Whether you are a professional tradesperson or a DIY enthusiast, understanding how to sharpen your tools correctly is essential. In this blog post, we will explore various sharpening techniques for different tools, helping you keep your tools in top shape.
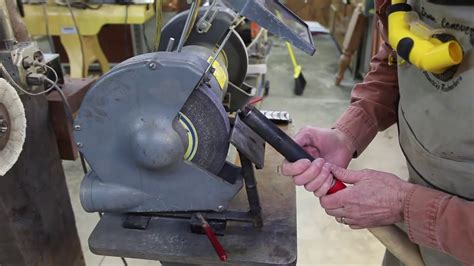
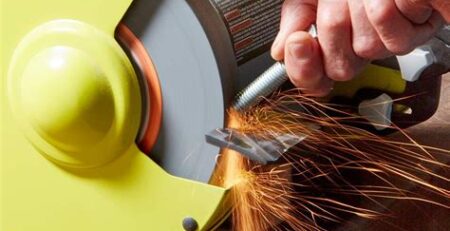
Sharpening techniques vary depending on the type of tool you are working with. Let’s start with chisels and plane blades. These tools typically have flat, beveled edges, and require sharpening on a flat surface. One popular technique is using a sharpening stone or bench grinder. Begin by ensuring the stone or grinder is properly secured and stable. Then, hold the chisel or blade at the correct angle and move it back and forth across the stone or grinder, applying even pressure.
For knives, sharpening can be done using a sharpening stone or a honing rod. The key is to maintain the correct angle, typically around 15 to 20 degrees, while doing smooth, controlled strokes. Start with the coarse side of the stone, if using one, and gradually move to the finer side for a polished and sharp edge. Alternatively, a honing rod can be used by placing the blade at the rod’s base and sliding it across the rod while maintaining the correct angle.
Now let’s talk about drill bits. These cylindrical tools can lose their sharpness over time, affecting their drilling performance. To sharpen a dull drill bit, you can use a specialized drill bit sharpener. These sharpeners typically have adjustable settings to accommodate different sizes of drill bits. Follow the manufacturer’s instructions and ensure the drill bit is placed correctly in the sharpener before sharpening. This will help restore the sharp cutting edges and extend the life of your drill bits.
- Chisels and plane blades: Use a sharpening stone or bench grinder
- Knives: Utilize a sharpening stone or honing rod
- Drill bits: Invest in a drill bit sharpener for optimal results
Other tools, such as saws and scissors, also have their own sharpening techniques. Saws can be sharpened using a flat file or specialized saw file. Scissors, on the other hand, can be sharpened using a sharpening stone or a honing rod designed specifically for scissors. These tools often require precision and attention to detail, so it is important to familiarize yourself with the specific sharpening techniques recommended for each tool.
| Tool | Sharpening Technique |
|---|---|
| Chisels and plane blades | Sharpening stone or bench grinder |
| Knives | Sharpening stone or honing rod |
| Drill bits | Drill bit sharpener |
| Saws | Flat file or specialized saw file |
| Scissors | Sharpening stone or scissor-specific honing rod |
Remember, sharpening tools is not just about improving their performance; it is also crucial for your safety. Dull tools can be more difficult to control and can increase the risk of accidents. Regularly sharpening your tools ensures they are always in optimal condition, allowing you to work efficiently and safely. So, take the time to learn and practice the appropriate sharpening techniques for your tools. Your tools will thank you, and so will your projects!
Safety Tips and Best Practices
When it comes to using a bench grinder, safety should always be your top priority. This powerful tool can quickly sharpen and shape various materials, but if not used correctly, it can also cause serious injuries. By following safety tips and implementing best practices, you can ensure a smooth and accident-free grinding experience.
First and foremost, it is vital to wear the proper protective gear. This includes safety goggles to protect your eyes from any debris or sparks that may be produced during the grinding process. Additionally, wearing earplugs or earmuffs is recommended to protect your hearing from the loud noise generated by the bench grinder.
Another crucial safety measure is to secure the workpiece firmly. Make use of clamps or other appropriate methods to ensure the object you are grinding is stable and won’t slip or move unexpectedly. This helps to prevent accidents and makes it easier to control the grinding process.
- Always inspect the grinding wheel before use. Look for any cracks, chips, or signs of wear and tear. A damaged wheel can easily break during operation, causing serious harm. If you notice any defects, replace the wheel immediately.
- Maintain a safe distance between your hands and the grinding wheel. Avoid placing your fingers too close to the wheel since it can catch loose clothing or accessories. Utilize tools such as a grinding rest or a jig to keep a safe distance and maintain control over the grinding process.
- Regularly clean the workspace and remove any debris or metal shavings that may accumulate. These can cause the wheel to become unbalanced or lead to unpredictable movements during grinding. A clean and organized work area ensures better safety and efficiency.
| Do’s | Don’ts |
|---|---|
| Do wear safety gloves to protect your hands from potential sharp edges or debris. | Don’t wear loose clothing, jewelry, or accessories that can get caught in the grinding wheel. |
| Do take regular breaks to avoid fatigue, as it can affect your concentration and increase the risk of accidents. | Don’t use excessive force or pressure when grinding. Let the wheel do the work and apply gentle, consistent pressure. |
| Do use the appropriate speed and pressure for the material you are working with. Different materials require different grinding techniques. | Don’t operate the bench grinder if you are feeling drowsy, under the influence of drugs or alcohol, or distracted. |
Frequently Asked Questions
What is a bench grinder and how does it work?
A bench grinder is a type of power tool that is used for shaping and sharpening metal. It consists of a motor that drives a pair of wheels which spin at a high speed. The grinding wheels have abrasive particles on their surface, which are used to remove material from the workpiece.
How do I choose the right grinding wheel for my bench grinder?
To choose the right grinding wheel for your bench grinder, you need to consider factors like the material you’ll be grinding, the hardness of the material, the required finish, and the size of the wheel. Opt for a wheel that is compatible with your grinder and meets your specific needs.
What should I do to prepare my tools for sharpening?
Before sharpening your tools on a bench grinder, make sure to clean them thoroughly to remove dirt and debris. Check for any damage or defects, such as cracks or chips, and repair or replace the tools if necessary. It’s also important to inspect and adjust the tool rest and eye shields of your grinder for proper sharpening.
What are some sharpening techniques for different tools?
Different tools require different sharpening techniques on a bench grinder. For example, for chisels and plane irons, use a shallow angle and make smooth, steady strokes. For drill bits, position the bit at the correct angle and carefully rotate it against the grinding wheel. Always refer to the manufacturer’s guidelines or seek professional advice for specific tools.
What are some safety tips and best practices when using a bench grinder?
When using a bench grinder, always wear safety goggles or a face shield to protect your eyes from sparks and debris. Ensure that the grinder is securely mounted on a stable surface and that the wheels are properly aligned and adjusted. Avoid wearing loose clothing or jewelry that could get caught in the grinder. Finally, never force the workpiece against the wheel and always maintain a firm grip on the tool being sharpened.
How can I maintain and clean my bench grinder?
To maintain your bench grinder, regularly clean the grinding wheels and remove any built-up residue or debris. Inspect the wheels for damage and replace them if needed. In addition, lubricate the moving parts of the grinder to ensure smooth operation. It’s also important to periodically check the tightness of all the screws and bolts on the grinder and make any necessary adjustments.
What are some common issues with bench grinders and how can I troubleshoot them?
Common issues with bench grinders include vibration, excessive heat, and wheel wobbling. If you experience vibration, it may be due to improper wheel balancing or a loose grinder base. Excessive heat can be caused by prolonged use or a dull grinding wheel. Wheel wobbling can be due to an unbalanced wheel or a damaged spindle. To troubleshoot these issues, check and fix the wheel balance, tighten all the components, replace worn-out wheels, and seek professional help if needed.


Leave a Reply