
Beginner’s Guide to Using a Router Tool
A router tool is a versatile and essential tool for woodworkers and DIY enthusiasts alike. It allows users to create intricate designs, shapes, and edges on various materials such as wood, plastic, or metal. In this blog post, we will explore what a router tool is, the different types available, and delve into the key safety precautions one must take when using this powerful tool. Additionally, we will provide a step-by-step guide on how to set up and effectively use a router tool. Finally, we’ll discuss some common mistakes to avoid to ensure a seamless and successful routing experience.
What is a router tool?
A router tool is a versatile and essential power tool used in woodworking. It is designed to hollow out an area in a piece of wood or other materials. The main purpose of a router tool is to shape, groove, cut, or finish different types of materials with precision and accuracy. The tool is equipped with a high-speed rotating bit that removes material, leaving a clean and smooth edge or surface.
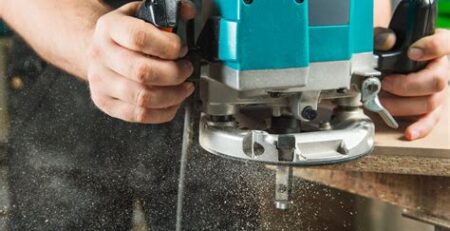
There are several types of router tools available in the market, each having its own unique features and applications. The most common types of router tools include plunge routers, trim routers, and fixed-base routers. Plunge routers are ideal for making deep cuts or starting cuts in the middle of a material. Trim routers, as the name suggests, are perfect for trimming edges and making small and detailed cuts. Fixed-base routers are popular for their stability and accuracy, making them suitable for heavy-duty tasks such as cabinetry work.
When using a router tool, it is crucial to prioritize safety to avoid accidents or injuries. Here are some key safety precautions to keep in mind:
- Wear protective gear: Always wear safety glasses, ear protection, and a dust mask to protect your eyes, ears, and lungs from potential hazards.
- Secure the workpiece: Ensure that the material you are working on is securely clamped or held in place to prevent it from slipping or moving during the routing process.
- Use the proper router bit: Select the appropriate router bit for the specific task you want to accomplish. Using the wrong bit can lead to poor results or accidents.
Using a router tool requires proper setup and technique. Here is a step-by-step guide to help you set up and use a router tool effectively:
- Choose the right router bit: Select the router bit based on the type of cut or shaping you want to achieve.
- Install the router bit: Follow the manufacturer’s instructions to install the router bit securely in the router tool.
- Adjust the depth of cut: Set the appropriate depth of cut on the router tool. This determines how much material will be removed with each pass.
- Secure the workpiece: Clamp or secure the workpiece firmly to prevent movement during the routing process.
- Start routing: Turn on the router tool and carefully guide it along the desired path, applying consistent pressure.
- Finish and clean up: Once you have completed the routing task, turn off the router tool and clean the work area of any wood chips or debris.
While using a router tool, it is important to be aware of some common mistakes that should be avoided:
- Starting too fast: It is vital to start the router tool at a slow speed and gradually increase it to prevent the material from tearing or splintering.
- Ignoring router maintenance: Regularly clean the router tool, change worn-out bits, and lubricate moving parts to ensure optimal performance and longevity.
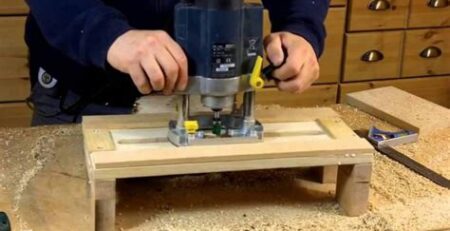
- Forgetting to use a router table: When working with smaller pieces of material, using a router table can provide stability and safety.
| Pros | Cons |
|---|---|
| Allows precise and accurate cuts | Requires proper setup and safety precautions |
| Versatile tool for various woodworking tasks | Can be intimidating for beginners |
| Offers different types of router bits for different applications | Can be noisy and generate a lot of dust |
In conclusion, a router tool is an indispensable tool for any woodworking enthusiast or professional. It provides endless possibilities for creating intricate designs, shaping edges, and achieving precise cuts. By understanding its different types, following safety precautions, and mastering proper techniques, you can unlock the full potential of this powerful tool and take your woodworking projects to the next level.
Understanding the different types of router tools
Router tools are essential for any woodworking or DIY enthusiast. They are versatile and powerful tools that can be used for various tasks such as cutting, shaping, and hollowing out materials. If you are new to woodworking or looking to expand your tool collection, it is important to understand the different types of router tools available in the market. Each type has its own unique features and applications, making it important to choose the right one for your specific needs.
One of the most common types of router tools is the plunge router. This type of router is designed to plunge the bit into the material, allowing for controlled and precise cutting. It is commonly used for tasks such as creating grooves, dadoes, and mortises. The ability to plunge the bit into the material makes it a versatile option for both edge and interior cuts. Plunge routers usually have a depth stop that allows you to set the desired cutting depth, ensuring consistent and accurate results.
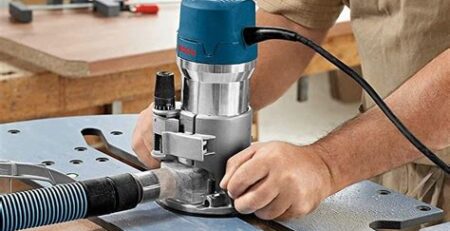
Another type of router tool is the fixed-base router. As the name suggests, this type of router has a fixed base that is positioned on the material before the cutting process. Unlike plunge routers, fixed-base routers are not designed for plunging cuts. They are ideal for tasks such as edge profiling and routing slots. The fixed base provides stability and control, allowing for precise and accurate cuts. Some fixed-base routers may also have variable speed settings, which can be useful when working with different types of materials.
In addition to plunge and fixed-base routers, there are also trim routers available in the market. Trim routers are compact and lightweight, making them suitable for smaller and more intricate tasks. They are commonly used for tasks such as trimming laminate, rounding over edges, and creating decorative details. Trim routers are easy to handle and maneuver, making them a popular choice among hobbyists and those who work on smaller projects.
It is important to note that while understanding the different types of router tools is crucial, safety should always be a top priority. When using router tools, it is important to wear protective gear such as safety glasses and earplugs. Additionally, make sure to read and follow the manufacturer’s instructions for your specific router tool. Do not force the tool beyond its capabilities and always ensure that the router bit is properly secured before use. Taking these safety precautions will help ensure a safe and enjoyable woodworking experience.
To sum up, router tools are an essential part of any woodworking arsenal. Understanding the different types of router tools available will help you choose the right one for your specific needs. Whether it is a plunge router, fixed-base router, or trim router, each type has its own unique features and applications. However, always prioritize safety when using router tools by wearing protective gear and following the manufacturer’s instructions. By doing so, you can enjoy the versatility and precision that router tools bring to your woodworking projects.
Key safety precautions when using a router tool
When it comes to using a router tool, it is important to prioritize safety above all else. Router tools are powerful and versatile, but they can also be dangerous if not handled properly. In this blog post, we will discuss the key safety precautions that you should keep in mind when using a router tool.
Wear protective gear:
One of the most important safety precautions when using a router tool is to wear the necessary protective gear. This includes safety glasses to protect your eyes from flying debris, ear protection to guard against the loud noise generated by the tool, and a dust mask to prevent inhalation of dust particles. Additionally, it is advisable to wear long sleeves and pants to protect your skin from accidental contact with the router bit.
Use the right router bit and speed:
Choosing the correct router bit for your specific task is essential for both effectiveness and safety. Ensure that the bit is sharp and undamaged before using it. Additionally, using the appropriate speed setting for your router tool is crucial. High speeds can cause the bit to heat up, posing a risk of burns or damage to the material being worked on. Conversely, using too low a speed may result in poor performance and potential kickback.
Secure the workpiece and maintain control:
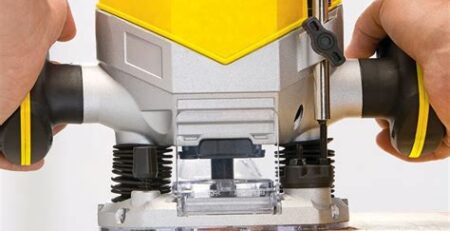
Before starting any routing operation, it is imperative to properly secure the workpiece to a stable surface. This can be done using clamps or a vise. This not only ensures stability but also reduces the risk of the material being thrown off balance and causing harm. Additionally, maintaining proper control over the router tool is essential. Hold the tool with both hands, keeping a firm grip and applying consistent pressure throughout the operation. Avoid using excessive force that may lead to loss of control.
Avoid distractions and keep a clean workspace:
When working with a router tool, it is crucial to eliminate any potential distractions in your workspace. This includes keeping pets, children, and other individuals away from the area to prevent accidents. Furthermore, maintaining a clean workspace is important to avoid any tripping hazards and ensure smooth movement while operating the router tool. Routinely remove debris and sawdust from the work area to maintain a clear line of sight and prevent any obstructions.
Know your limitations and seek guidance:
Lastly, it is essential to know your limitations when it comes to using a router tool. If you are unfamiliar with a particular operation or technique, consult the tool’s manual or seek guidance from a more experienced user. Taking the time to understand and practice proper techniques can greatly reduce the risk of accidents or injuries.
By adhering to these key safety precautions, you can ensure a safer and more enjoyable experience when using a router tool. Remember, taking the necessary precautions may require a few extra minutes of preparation, but it is always worth it to prioritize safety first.
Step-by-step guide to setting up and using a router tool
Setting up and using a router tool can be a daunting task for beginners. However, with a step-by-step guide, you can easily understand the process and make the most out of this versatile tool. Whether you are a DIY enthusiast or a professional woodworker, having a clear understanding of how to set up and use a router tool is essential. In this blog post, we will provide you with a comprehensive step-by-step guide to help you get started.
Step 1: Choose the right router tool
Before you begin setting up, it is important to choose the right router tool for your needs. There are a variety of router tools available in the market, each designed for specific tasks. Some common types include plunge routers, fixed base routers, and trim routers. Consider the type of projects you will be working on and choose a router tool that suits your requirements.
Step 2: Assemble the router tool
Once you have chosen the right router tool, it’s time to assemble it. Begin by attaching the base to the tool and making sure it is securely fastened. Next, insert the router bit into the collet and tighten it using a wrench. It is important to ensure that the bit is centered and properly tightened to avoid any accidents or improper cuts. Refer to the manufacturer’s instructions for specific details on assembling your router tool.
Step 3: Adjust the depth and fence
Before you start using the router tool, it is crucial to adjust the depth and fence settings. The depth setting determines the amount of material that will be routed, while the fence helps in guiding the tool along the workpiece. Use the depth adjustment knob to set the desired depth and lock it in place. Adjust the fence according to the specific cut you want to make, ensuring it is parallel to the edge of the workpiece.
Step 4: Safety precautions
Prior to using the router tool, it is important to take key safety precautions. Always wear safety goggles to protect your eyes from flying debris, and ear protection to minimize noise. Additionally, use a dust mask to avoid inhaling dust particles. Keep your hands away from the router bit and use push sticks or other appropriate tools to guide the workpiece. Do not rush or force the tool; let it do the work at a steady pace. Familiarize yourself with the safety features and emergency stop button on your specific router tool.
Step 5: Start routing
With the router tool set up, adjusted, and safety precautions in place, it’s time to start routing. Begin by practicing on scrap wood to get a feel for the tool and the specific cut you want to make. Once you are comfortable, proceed to work on your actual project. Remember to work in the correct direction and take your time to ensure accuracy. Any mistakes can be costly and affect the final outcome of your project.
By following this step-by-step guide, you can confidently set up and use a router tool for your woodworking projects. Remember to always prioritize safety and take your time to master the tool. With practice, you will become more skilled and efficient in utilizing the router tool’s many capabilities.
Common mistakes to avoid when using a router tool
Using a router tool can be an intimidating task, especially for beginners. However, with the right knowledge and precautions, it can become a smooth and rewarding experience. To make the most out of your router tool usage, it is essential to be aware of the common mistakes that many people make. By avoiding these mistakes, you can ensure your safety and achieve accurate and professional results. Let’s delve into some of the most common mistakes one should avoid when using a router tool.
1. Incorrect bit selection:
One of the most crucial aspects of using a router tool is selecting the correct router bit for the task at hand. Using the wrong bit can result in rough cuts, tear-outs, or even damage to the workpiece. Take the time to understand the different types of router bits available and choose the appropriate one for your specific application. Research and consult experts to ensure you have the right bit for the desired outcome.
2. Poor router bit positioning:
The position of the router bit in relation to the workpiece greatly affects the quality of the cut. Improper positioning can lead to uneven or inaccurate cuts, ruining the final result. Always make sure the router bit is properly aligned and positioned at the correct height before starting the cut. Take the time to set up the router tool accurately, adjusting the depth and position as needed.
3. Neglecting safety measures:
Safety should be a top priority when using any power tool, including a router tool. It is essential to wear appropriate protective gear, such as safety glasses, ear protection, and a dust mask. Additionally, ensure your work area is well-lit and free from distractions or clutter. Avoid wearing loose clothing or jewelry that could get caught in the router. Familiarize yourself with the safety features of your router tool and always follow the manufacturer’s instructions.
4. Rushing the cuts:
When working with a router tool, it is crucial to maintain a steady and controlled pace. Rushing the cuts can lead to mistakes, such as uneven edges or jagged profiles. Take your time and let the router do the work, applying consistent pressure and maintaining a smooth motion. It is better to make multiple passes with light cuts rather than trying to remove too much material in a single pass.
5. Lack of practice and experimentation:
Like any skill, mastering the use of a router tool requires practice and experimentation. Many people make the mistake of attempting complex projects without sufficient practice, leading to disappointing results. Start with simple projects and gradually build your skills and confidence. Take the time to learn different techniques and experiment with different router bits and settings. Embrace a learning mindset and don’t be afraid to make mistakes and learn from them.
Avoiding these common mistakes when using a router tool will greatly enhance your woodworking experience. By selecting the right router bit, positioning it accurately, prioritizing safety, maintaining a steady pace, and practicing regularly, you can achieve impressive and precise results. Remember, patience and attention to detail are key when working with a router tool. So, take the time to learn, practice, and enjoy the process of creating beautiful and professional woodworking projects.
Frequently Asked Questions
What is a router tool?
A router tool is a power tool used in woodworking to hollow out an area in a hard workpiece. It is commonly used to create decorative edges, cut grooves, and make precise cuts.
Understanding the different types of router tools
Router tools come in various types, such as fixed-base routers, plunge routers, combo routers, and trim routers. Each type has its own features and applications, so it’s important to choose the right one based on your specific woodworking needs.
Key safety precautions when using a router tool
When using a router tool, it is crucial to wear safety goggles, hearing protection, and appropriate clothing. Always ensure the router is securely mounted and the workpiece is properly secured. Keep your hands away from the cutting area and use push sticks or blocks when necessary.
Step-by-step guide to setting up and using a router tool
To set up a router tool, start by choosing the appropriate router bit for your desired cut. Secure the bit in the collet and adjust the cutting depth. Next, attach the router to a stable work surface and turn it on. Slowly guide the router along the intended path, maintaining a consistent speed and pressure.
Common mistakes to avoid when using a router tool
Some common mistakes to avoid when using a router tool include applying too much pressure, using dull router bits, not using a router table for stability, and neglecting to secure the workpiece properly. Additionally, it’s important to avoid making deep cuts in one pass and to always follow the manufacturer’s guidelines.
Advantages of using a router tool
Using a router tool offers several advantages. It allows for precise and intricate cuts, helps create smooth edges, and enables the creation of decorative profiles. Additionally, router tools are versatile and can be used on various materials, including wood, plastic, and even metal.
How to maintain and clean your router tool
To maintain and clean your router tool, make sure to regularly inspect and clean the router bit, removing any debris or buildup. Lubricate the router’s moving parts as recommended by the manufacturer. Keep the router’s motor housing clean and ensure the power cord is in good condition. Store the tool in a dry and secure place when not in use.
Where to buy a router tool
Router tools can be purchased at various hardware stores, home improvement centers, and online retailers. Popular options include specialized woodworking stores, such as Woodcraft and Rockler, as well as general retailers like Amazon and Home Depot. Make sure to compare prices, read customer reviews, and consider the specific features you require before making a purchase.


Leave a Reply